Transform & Animation

The Transform tool is used to move, rotate, or scale the object selection.
How to transform objects
Move, rotate, and scale transforms methods are supported. Use the transform manipulator or numeric keyboard entries to transform the selected objects. Locked objects cannot be transformed. Review the lock status of objects or its parent group in the ObjectLister. World Coordinate System vs Local Coordinate SystemThe local coordinate axis is aligned with rotation of just that selected node: whether it is a group node or a geometry node. TranslationThe current value of the transform is shown on option box. The coordinate system and numeric values can be modified as discussed in this section. RotationThe value entered rotates the object by those degrees. Users can also use arrow keys for fine rotation. ScaleThe value entered scales the object. For example a value of 3.14 scales the object by that value. For convenient conversions of imported objects, you can select the root group node of that object and set units such as mm, m, ft, in, etc. |
Tip: Use ctrl+z to undo transforms. |
Transform PivotPress and hold left mouse button on object location where you want to place the transform pivot for the selected object. A context menu will show up Set Transform pivot: Use it to set the transform pivot Reset Transform pivot: Unset the transform pivot, so the default pivot placed at center of bounding box of the object can be used. |
|

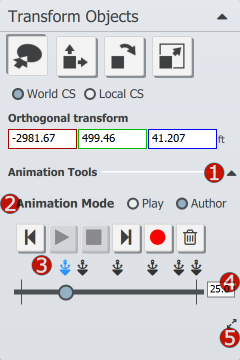
How to Animate Objects
You can move an object at different positions and orientations and mark them as a "keypoint" Several objects can be played back with synchronization in V1.6.1 and higher. AuthorUse the Record button to set the first keyframe, apply a transform, and record additional keyframes.
- Lock key: The key can not be moved. In this example the keyframe is at 25 on a scale [0-100] - Copy Transform Keyframe to Object - Set the object transform to the value of the keyframe's transform. - Copy Transform Object to Keyframe - Modify the keyframe's transform to the value of Object's current transform. - Delete key - delete this keyframe
|
|
PlayAll the visible nodes that have animation keyframes set on them, will playback the animation sequence. You do not have to select the nodes.
|
|


Created with the Standard Edition of HelpNDoc: Create cross-platform Qt Help files